I’d like to tell you a story.
Last year, someone I love a lot needed a kidney transplant. This isn’t the story of the transplant. It’s about something I did in the months leading up to the surgery, what my friend the psychologist would call a “coping mechanism.”
When the doctors started talking transplant, I freaked out a little. I had thought the options were a) get better, or b) death. I didn’t consider the third option: major surgery on two people I love. But that’s where this particular journey took us.
I wanted to learn all I could about the procedure. (Fun fact: unless they’re septic, the old kidneys are not removed!) I found myself staring at medical diagrams like this one. And I remembered something from high school – the world of difference between staring at a diagram and trying to draw it.
I don’t remember making the decision, but soon enough I was pawing through my stash for various bits and bobs of different colored yarns. Yes, my coping strategy was this: I knit a kidney transplant diagram.
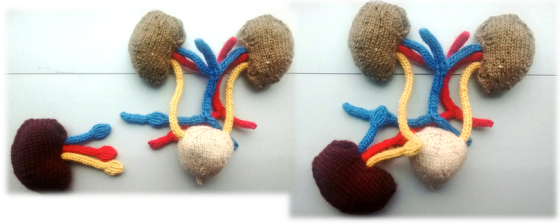
To da! It even has magnets, so you can “attach” the transplanted kidney.
Some technical notes on the construction:
- I started with this kidney pattern, which I found on Ravelry (apparently I’m not the first person to have the idea to knit organs). I wasn’t entirely happy with it, so I tweaked and re-worked it until I was. I made the decreases symmetrical (k2tog, ssk), and I moved them in a stitch or two so that the kidney was less flat. Eventually, I was happy with my design. As with any amiguri project, I kept my gauge nice and firm, so that the stuffing wouldn’t show through.
- I free-wheeled the bladder. I started it like a top-down hat, worked a few rows stockinette once it was big enough, then closed it off like a bottom-up hat. The bladder in the diagram was flatter at the top, so I used more “wedges” on the top half, to increase faster. Eight wedges on top, six on the bottom. I ended it with a few rows of i-cord to make the little knob at the bottom.
- The blood vessels and ureters are i-cord. (Yes, I knitted pee-tubes!) 4-stitch for the “trunk” vessels, 3-stitch for the “branches.” I had some fun joining them together at the “crotches” (a word my kid will not believe has a non-giggle-worthy meaning). The magnets I bought didn’t fit inside the i-cord, so when I got to the point where I needed to insert a magnet, I increased a couple of stitches to go up to 6 stitches for a few rows, tucked in the magnet, then decreased again. This had the added bonus of keeping the magnets in place, since they couldn’t slide around. I did check, repeatedly, that I had placed the magnet pairs so that everything snapped in place as it should – I didn’t want them hovering in space, or twisting around.
- I attached the i-cords to the organs by pulling the entire end of the i-cord through a stitch and anchoring it on the inside. Very clean and easy to control. This meant I had to go in a certain order:
-
- Make the organs, up to the last few rows. Attach the magnet to the inside of the bladder.
- Make the i-cords.
- Attach the i-cords.
- Stuff the organs. Finish and sew them up.
I grew superstitious about this project. I didn’t tell the “patient” about it, and I didn’t work on it at home. That meant I did most of the work at the karate dojo. As it took shape, people started asking me about it. I’d explain, and then the most amazing thing would happen. “Oh, my aunt’s on dialysis.” “My co-worker had a transplant two years ago and she’s doing great.” “My brother’s on the list and we’re praying.”
I wasn’t alone. In all my terror, in all my freakout, I felt so alone. But I wasn’t.
I took the finished diagram to the hospital with me. Those pictures above are the only ones I have – I took them on the windowsill in the ICU. The surgery went really well. The wonderful surgeon came to check on us every day. One day, as she was leaving, I gathered up my courage. “Do you have another minute?” I asked. “I’d like to show you something.” I pulled out my diagram and arranged it. She looked at it, quizzically, and after a moment she said, “This is anatomically correct.” It was the best comment she could have made. I gave it to her, and she said “Thank you. I will use this.” She didn’t say how, but I imagine that if she works on kids, she could use this cushy, wooly thing to show them what’s going to happen. I hope it helps.
So if you’re scared about something, I have some suggestions:
- Learn all you can. Solid knowledge is much more comforting than what my imagination can conjure up.
- Make something with what you learn. There’s magic in making something with your hands. And, I’ve thought a lot about this: I think writing counts. Whether you type or put pen to paper, you’re making something outside of your head, that you can step back and evaluate and edit. Writing counts as making, in my book.
- Talk to people. Whether the thing you make acts as an ice-breaker or you just reach out in any way you can, talk to some human beings. There are so many of us, and we’re really not all that different. Company eases fear.
This post was inspired by Martha Beck, who says to take the thing that fascinates you enough that you already have 10,000 hours practice (knitting) and which has seen you through hell (health crisis) and share it. So that’s what I’ve done.

Brava Suzyn! because I am at a loss for words.
Oh, Gail – thank you!
Love how this amazing art escorted you through hell and brought the gift of connection. Amazing story. Beautifully written. You are so eloquent! (And brave!)
Ohhhh – thank you, Memrie!
Truly inspiring. thank you.
Thank you!