Should you, for any reason whatsoever, wish to make a hat based on the Ally Flag, either during the Sochi Olympics or at any other time, well, here’s a pattern for you. This hat is dedicated to Team SHERlocked, who inspired the Rainbowllenics Parade.

This hat is worked in garter st, flat.
Yarn: I made the original in ancient stash yarn that’s a touch heavier than worsted, with bits and bites of random worsted yarns for the stripes. You can use any yarn you like! You’ll need approximately equal amounts of black and white, and a few yards each of the 6 colors. Alternatively, you could use a black and white variegated yarn and a colorful variegated yarn for a more “impressionistic” approach. I’ll write the instructions for stripes, though.
Needles: Something appropriate for the yarn. I went up a needle size and was happy – it made the garter st a little loftier. Although you could, theoretically use straight needles, a circular will allow you to try it on. You may also want to go down a size or two for the bottom ribbing. Unless, of course, you don’t want ribbing at the bottom.
Accoutrements: You’ll need 7 st markers and a tapestry needle
Notes: You have two options when it comes to working the A. I’d recommend you decide ahead of time which you’ll do, so that you can prepare your yarn accordingly.
- Option A: Work in pure intarsia. You’ll need two separate balls of black and white, plus little bits of each for between the legs of the A. The advantage here is that the tension is easier to manage, though all the balls of yarn aren’t.
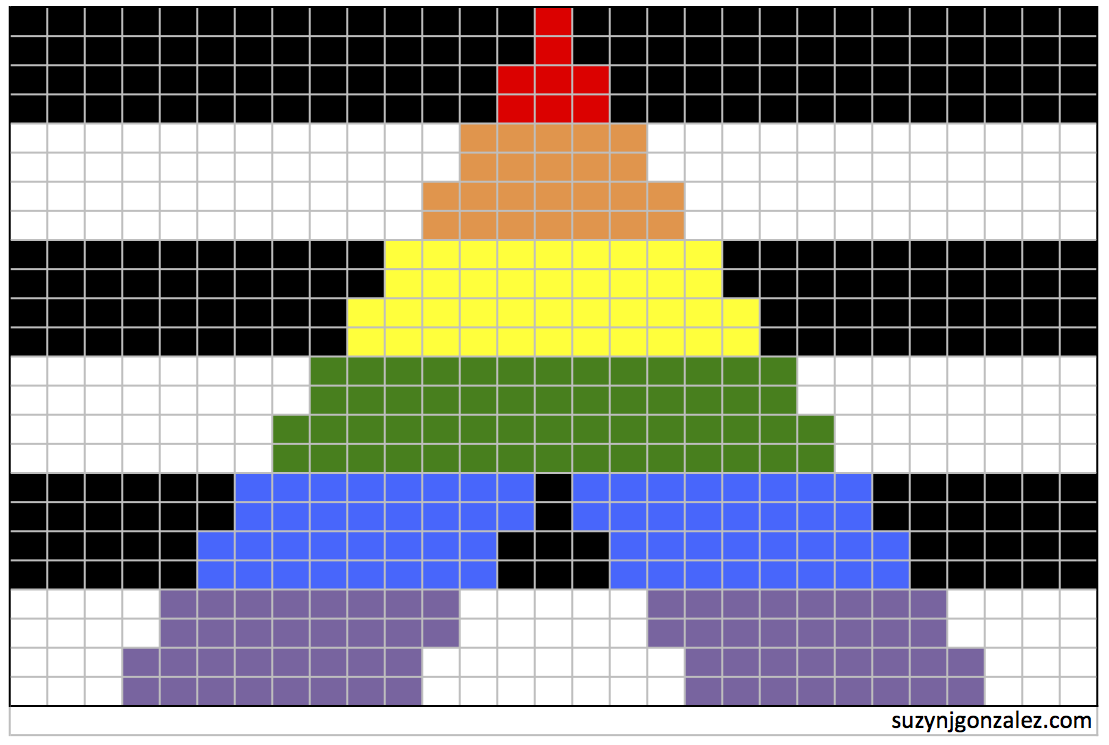
- Option B: This is what I did – draw the black or white yarn across the back of the A. You have to be good about your tension here, but it gives you fewer balls to manage. If you’re going to do this, here’s a trick: When you’re working on the right side, twist the carried (black or white) yarn every 3-4 st. However, when you’re working on the WS, just pull the carried yarn across the entire section (be sure to give yourself enough slack that you don’t make the A pouf). Then, on the next RS row, in addition to twisting your yarn every 3-4 st, also pick up the slack yarn once or twice and work it into a stitch. To do this, put your right needle in the next st, then poke it under the slack yarn. Wrap your yarn and finish the st as usual. There should be no effect on the RS. (See those little white flecks in the orange stripe? That’s where I forgot that you can’t twist yarn into the WS of garter st.)
More Notes: Theoretically, since this is top-down construction, you could use ANY weight of yarn. You just keep increasing until it’s the right size. The big difference is going to be the size of the A in different size yarns. So, if you’re using a bulky yarn, you may want to have only two rows per stripe. If you’re working in DK, Sport or smaller, you may want 6 or even 8 rows per stripe. The idea is the same – start with one red stitch, increase one st on either side every other row, and switch colors when you switch background color. You always want an even number of rows per stripe, and to start a new stripe on a RS row, for crisp color transitions.
And yet more notes! To increase in garter st, I like to knit into the purl bump below the next st.
Abbreviations
| BO | Bind Off |
| CO | Cast On |
| Garter St | K on RS, K on WS |
| Inc | Increase |
| K | Knit |
| PM | Place St Marker |
| RS | Right Side |
| St | Stitch |
| WS | Wrong Side |
Shall we start?
With black yarn and larger needles, CO 8 st.
Setup row (and all WS rows): K with the yarn you used for the previous row.
Row 1 (RS): [Inc 1, K1, PM] repeat to end (16 st) (no, you don’t have to PM at the end of the row)
Row 3: Start using white yarn. [Inc 1, K 2] repeat to end (24 st)
Row 5: At the beginning of the row, twist the black and white yarn. Use white yarn for the next four rows. [Inc 1, K3] repeat to end (32 st)
Row 7: Drop white yarn and pick up the black yarn from underneath. Use black yarn for the next four rows. [Inc 1, K4] repeat to end (40 st)
Continue in this manner, [Inc 1, K to next marker, sl M] repeat to end (incr 8 st per row), until the hat is the right size around. Don’t remove the markers – you may want them later.
Ok, more note time, now! If you want a beanie, stop increasing when the width is equal to the head circumference you’re aiming for, or maybe an inch or two less for snugness. If you want to make more of a beret shape, like mine, make it an inch or two larger than the head size. I have made many many top down hats and I get this wrong ALL THE TIME (seriously – I was going for a beanie when I made the original). If you discover that your hat is too big, there are two things you can do: 1) mark where you should have stopped increasing, and rip back to that point. 2) work some decreases towards the end and call it a beret.
Once your hat is the right size, stop increasing and just work Garter st until you get to the end of a white row. Pick a point where you want the A to begin – the half-way point is a good spot. Work the chart, placing the first red st where you chose.
When you’re done with the chart, keep going with stripes until the hat is as deep as you like. If you’re making a beret, now would be a good time to decrease at each marker for a round or two.
Finally, end as you like: switch to smaller needles and work a rib, or switch to stockinette (K on RS, P on WS) to make a rolled brim, or just keep going in garter st until it’s long enough. BO loosely. For rib, I like this bind off. Cut your yarn, leaving a nice long tail for sewing up.
Carefully sew in the colored ends, making sure to close any holes.
Now, for the seam. I think of sewing garter st seams as a zipper: take your BO tail, thread it onto a tapestry needle, then go through single purl bumps on alternate sides until it’s all “zipped up.” It’s easy to make this seam too tight, so give it a nice stretch once you get to the top. Then go through every other CO st and pull tight to get rid of the hole at the top.
Block if you care to; I rarely do.
Enjoy and wear with, dare I say it, pride! Here’s the Ravelry link.
Comments or questions? Please ask away!
