In the rush of the past week, I forgot to blog about my latest pattern! This is pure Sherlock fun, cosplay for your hands. Make two Sherlock gloves, two John gloves, or one of each. Act out your favorite scenes from your favorite show!


In the rush of the past week, I forgot to blog about my latest pattern! This is pure Sherlock fun, cosplay for your hands. Make two Sherlock gloves, two John gloves, or one of each. Act out your favorite scenes from your favorite show!
Should you, for any reason whatsoever, wish to make a hat based on the Ally Flag, either during the Sochi Olympics or at any other time, well, here’s a pattern for you. This hat is dedicated to Team SHERlocked, who inspired the Rainbowllenics Parade.

This hat is worked in garter st, flat.
Yarn: I made the original in ancient stash yarn that’s a touch heavier than worsted, with bits and bites of random worsted yarns for the stripes. You can use any yarn you like! You’ll need approximately equal amounts of black and white, and a few yards each of the 6 colors. Alternatively, you could use a black and white variegated yarn and a colorful variegated yarn for a more “impressionistic” approach. I’ll write the instructions for stripes, though.
Needles: Something appropriate for the yarn. I went up a needle size and was happy – it made the garter st a little loftier. Although you could, theoretically use straight needles, a circular will allow you to try it on. You may also want to go down a size or two for the bottom ribbing. Unless, of course, you don’t want ribbing at the bottom.
Accoutrements: You’ll need 7 st markers and a tapestry needle
Notes: You have two options when it comes to working the A. I’d recommend you decide ahead of time which you’ll do, so that you can prepare your yarn accordingly.
More Notes: Theoretically, since this is top-down construction, you could use ANY weight of yarn. You just keep increasing until it’s the right size. The big difference is going to be the size of the A in different size yarns. So, if you’re using a bulky yarn, you may want to have only two rows per stripe. If you’re working in DK, Sport or smaller, you may want 6 or even 8 rows per stripe. The idea is the same – start with one red stitch, increase one st on either side every other row, and switch colors when you switch background color. You always want an even number of rows per stripe, and to start a new stripe on a RS row, for crisp color transitions.
And yet more notes! To increase in garter st, I like to knit into the purl bump below the next st.
Abbreviations
| BO | Bind Off |
| CO | Cast On |
| Garter St | K on RS, K on WS |
| Inc | Increase |
| K | Knit |
| PM | Place St Marker |
| RS | Right Side |
| St | Stitch |
| WS | Wrong Side |
Shall we start?
With black yarn and larger needles, CO 8 st.
Setup row (and all WS rows): K with the yarn you used for the previous row.
Row 1 (RS): [Inc 1, K1, PM] repeat to end (16 st) (no, you don’t have to PM at the end of the row)
Row 3: Start using white yarn. [Inc 1, K 2] repeat to end (24 st)
Row 5: At the beginning of the row, twist the black and white yarn. Use white yarn for the next four rows. [Inc 1, K3] repeat to end (32 st)
Row 7: Drop white yarn and pick up the black yarn from underneath. Use black yarn for the next four rows. [Inc 1, K4] repeat to end (40 st)
Continue in this manner, [Inc 1, K to next marker, sl M] repeat to end (incr 8 st per row), until the hat is the right size around. Don’t remove the markers – you may want them later.
Ok, more note time, now! If you want a beanie, stop increasing when the width is equal to the head circumference you’re aiming for, or maybe an inch or two less for snugness. If you want to make more of a beret shape, like mine, make it an inch or two larger than the head size. I have made many many top down hats and I get this wrong ALL THE TIME (seriously – I was going for a beanie when I made the original). If you discover that your hat is too big, there are two things you can do: 1) mark where you should have stopped increasing, and rip back to that point. 2) work some decreases towards the end and call it a beret.
Once your hat is the right size, stop increasing and just work Garter st until you get to the end of a white row. Pick a point where you want the A to begin – the half-way point is a good spot. Work the chart, placing the first red st where you chose.
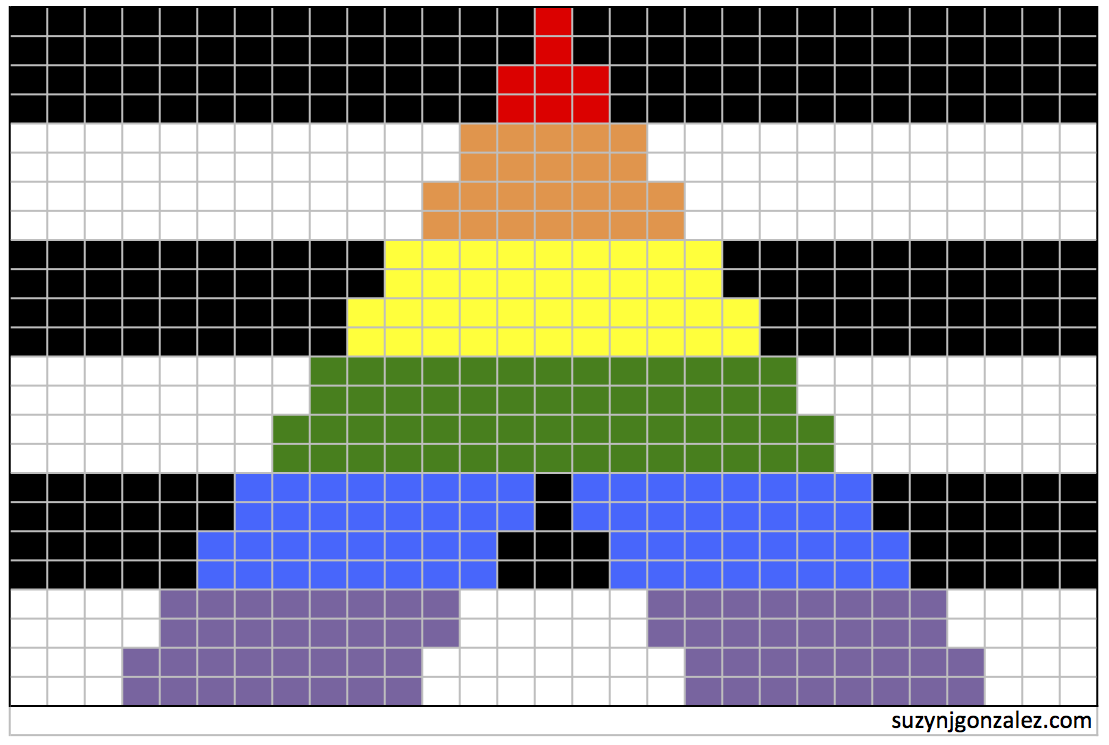
When you’re done with the chart, keep going with stripes until the hat is as deep as you like. If you’re making a beret, now would be a good time to decrease at each marker for a round or two.
Finally, end as you like: switch to smaller needles and work a rib, or switch to stockinette (K on RS, P on WS) to make a rolled brim, or just keep going in garter st until it’s long enough. BO loosely. For rib, I like this bind off. Cut your yarn, leaving a nice long tail for sewing up.
Carefully sew in the colored ends, making sure to close any holes.
Now, for the seam. I think of sewing garter st seams as a zipper: take your BO tail, thread it onto a tapestry needle, then go through single purl bumps on alternate sides until it’s all “zipped up.” It’s easy to make this seam too tight, so give it a nice stretch once you get to the top. Then go through every other CO st and pull tight to get rid of the hole at the top.
Block if you care to; I rarely do.
Enjoy and wear with, dare I say it, pride! Here’s the Ravelry link.
Comments or questions? Please ask away!
Ok, folks, I can take a hint. My two Top-Down, No Math hats account for over half the hits I have ever gotten on this site. So, I will give you more. Yes! A new Top-Down, No Math hat, this time aptly named: FourSquare. It looks like a hot-cross bun, doesn’t it?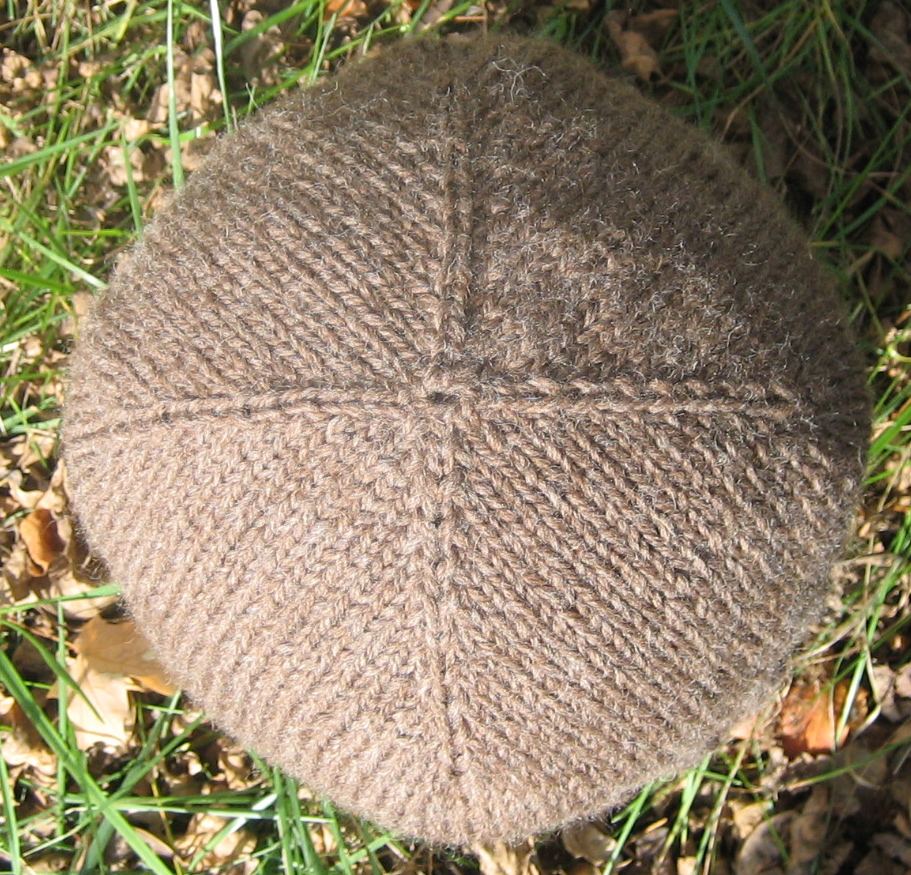
Here we go:
Yarn: Same as the others, yarn is whatever you like, about a hat’s worth. In the sample, I used Cascade EcoWool, which is lovely stuff.
Needles: Needles should be appropriate to the yarn. You’ll need to start either on dpns or a magic loop. By the end, you’ll either need more/longer dpns, or a circular.
Notes: We’re going to use two different increases. The first is the same nearly invisible increase we used before. The second is the same idea, but heading left. I’m going to point you to this lovely tutorial from the Twist Collective, and use her terminology: RLI and LLI. (I’m told that link is now dead, but this one should work.)

Ready? Let’s begin.
CO 8. Join in the round, being careful not to twist.
Round 1: K all, placing a marker after stitches 1, 3, 5, and 7.
Round 2: [RLI, K2, LLI] 4 times (16 st)
Round 3 and all odd rounds: K
Round 4 and all even rounds: [K to 1 st before st marker, RLI, K2, LLI] 4 times, K to end of round.
So, here’s the weird part: even though you’re working 2 st around each marker, the result looks like a single st going the other direction. If you want the cross to be bulkier, you can work an extra stitch or two around each st marker (inside the increases).
Keep going until you have the circumference you want, then work plain stockinette until you feel like doing ribbing, have enough for it to curl under, or run out of yarn.
BO loosely. My favorite trick is to go up a few needle sizes for the bind-off row.
If you like this or any of my other patterns, would you drop me a comment letting me know? Nice comments make my day. Thanks.
Have you encountered BBC Sherlock yet?
Have you encountered BBC Sherlock fandom?
Have you encountered the Purple Shirt of Sex?
I have, recently, and when you add in the Ravellenic Games, well, there was only one logical course of action.
I present the Purple Teacozy of Sex:

The pattern is available on Ravelry and LoveKnitting. Why don’t you make yourself one!?
My first ever published knitting pattern wasn’t really a pattern. There was no specified yarn, no gauge, no sizes. The idea wasn’t to look at my sample and perfectly recreate it. Instead, I offered a (bewildering, to most) set of formulas (formulae?) that, if you plugged in your own gauge (with your favorite yarn) and your own measurements, would produce a t-shirt that fit YOU. There’s no way knitty would publish it now (and I’m so grateful that they did, back in the Wild Wild West days of no set sizes!)
A few brave souls plugged in their data and… it worked! They added stripes, they added cables – one lady even told me that my formulas were helpful when she was learning to design her own sweater patterns. This made me very very happy. Here, if you’re on Ravelry, you can see everyone’s projects.
Now, skip ahead to a little over a year ago, when I posted my most outrageously successful* knitting patterns. They’re not really patterns, either. Again, you use your own yarn, your own gauge, your own head size (or that of someone you love), and voila! A hat that fits. I think I improved on the T-shirt concept in that there are no formulas to fill out (hence the “no math” thing).
People have done all sorts of interesting things with them – I mean check out the creativity! (again, those are Ravelry links) I get comments like “I love this pattern! It is a little free-wheeling, but a great way to use up yarn.” This makes me very very happy.
Soooo (getting to the point at last) if you’re wondering (as I do at times) how someone goes from writing about knitting and designing knitting patterns to writing a book about weddings – well, there is a through line!
The book works the same way as the not-really-patterns. There’s a lot of fill-in-the-blanks, a lot of “what would YOU like?” It’s not a step-by-step guide for how to replicate something I’ve already imagined, but an invitation to put your own mark on your creation.
It is my fervent hope that the weddings that spring from this book are as varied, as unique, and as charming as all those hats and t-shirts. That would make me very very happy. (And that’s what it’s all about, right?)
* by “outrageously successful,” I mean triple-digit loves and double-digit projects on Ravelry!

 Adorable and quick ornaments – a great way to use up scraps of sock yarn. I used an initial motif over a background of stripes (and dots in one case). This works best with a motif that is 7-11 st wide and 8-10 st high.
Yarn: leftover sock yarn – or any yarn, for that matter
Needles: appropriate to weight of yarn used, dpns or circular
For the samples shown, I used Sport weight yarn and Sz 3 dpns.
Notions: stitch holder (or safety pin, or scrap of yarn) to hold live thumb stitches.
Sizes: bitty odd and bitty even. The two sizes listed ensure proper centering of odd(even) width motifs, i.e., if your motif is 9 stitches wide, use the first number, if it’s 10 stitches wide, use the second number. Subtract your motif width from 13(14) and divide that number by 2 – that’s the number of “border” stitches on either side of your motif, e.g., if your motif is 9 st wide, then figure 13-9=4/2=2 border st. Note that for a while, you’ll have more border stitches on one side of your motif because of the thumb shaping.
Cast on 18(20) st, arrange for magic loop or on 3 dpns (if using dpns, put half the stitches on one and split the rest onto two more – this way it’s easier to keep track of the two sides of the mitten.)
Arrange in a loop, being careful not to twist stitches.
Work 1×1 ribbing for 5-6 rounds.
Start whatever background pattern (e.g., stripes) you want now.
Round 1) Kfb, K1, Kfb, K2(3), Kfb, K1, Kfb, K1, repeat. 26(28 st)
2) K 11(12), Kfb, K1, Kfb, K to end
3) K
Now start your motif on top of your background pattern. Because the mitts will be hung on the tree from the cuff, work your motif upside-down.
You can pull your motif yarn straight across from the other side – after all, no one has to get their hands inside the mitt!
4) K border st, work top row of motif, K to last 2 st on that side, Kfb, K1, Kfb, K border st, work top row of motif , K border st
5) K, working motif as set
6) K border st, work motif, K to last 2 st on that side, Kfb, K1, Kfb, K to motif, work motif , K border st
7) K, working motif as set
8 ) K border st, work motif, K border st, slip next 6 st to a stitch holder, safety pin, or scrap of yarn, K border st, work motif, K border st
Keep going as set until motif is finished. Then work 2-3 rounds of background pattern.
Next round: (in pattern) SSK, K9(10), K2tog, repeat
Next round: (in pattern) SSK 3 times, [K1, K2tog twice](K2tog 3 times)
Cut yarn and pull through remaining st.
Now pick up the thumb st, and pick up two more st on the body side.
Work in pattern for 3-4 rounds, then K2tog 4 times, cut yarn, and pull yarn through remaining st.
You can pretty much stuff your yarn ends inside. Block if you want to. Use the CO tail to make a little loop, and hang it from your tree!
Look, a diagram!

Hi! I know you’re here for the hat pattern, which is the most popular thing here. But I wanted to let you know that my new book is up on Amazon! Check it out!
Well! My original Top-Down No Math Hat made a bit of a splash over on Ravelry, and I’m quite tickled about my 83 loves (and counting!) and many many queues.
It is Christmas knitting season, and as I set out to knit many many variations of the hat for those that I love, I had a sudden, sickening realization.
It’s kinda girly, isn’t it?
See, I have nephews. Three of them. I have two sons, too, but they’re little and they’re getting hats with trains on them. I also have two nieces, and, well, pretty stuff is easy. But I have three nephews and the youngest one is ten. They don’t want cute or funky – they want manly knits.
And so desperate times call for… new patterns.

A manly hat
Without further ado, I present my Top-Down No Math Hat: The Manly Version. (Hint: it’s pretty much the same pattern, without the YOs.)
Yarn: again, whatever you like. Any weight – truly doesn’t matter. About a hat’s worth (I do this by squishing it in my hand and seeing if it kinda feels like squishing a hat. As you can tell, I’m a bit cavalier with my knitting.)
Needles: whatever the label calls for, or a bit smaller. You can use dpns to start, then switch to a smallish (24”) circular, or you can stay on dpns throughout, or you can magic loop it.
Notions: a tapestry needle and a freewheeling attitude.
Pattern Note: what makes this pattern work is a particularly swish increase that I first found over at the awesomely wonderful TechKnitting: A very nearly invisible increase. Go take a look. When I use inc1 below, this is what I mean. Note that the inc1 should not “eat up” a st on your left hand needle. You should have the same number of st on your left hand needle before and after working the inc1, just as you would if you had worked a YO instead.

Very nearly invisible increases
CO 6 st. Distribute evenly on 3 dpns, or use a magic loop. Join, being careful not to twist.
Row 1 (and all odd rows): k
Row 2: inc1, k1, repeat to end (12 st)
Row 4: inc1, k2, repeat to end (18 st)
Row 6: inc1, k3, repeat to end (24 st)
You see what I’m doing here, right? Increasing 6 st in every other row, lining up the yos increases to make pretty swirly lines manly, nearly invisible shaping. Notice that it totally looks like you’re doing K2togs from the other direction. Freaky!
If you want a less pointy hat, CO 8 st. The idea is the same as the above, only you’ll be increasing by 8 st every other row.
Row 1 (and all odd rows): k
Row 2: inc1, k1, repeat to end (16 st)
Row 4: inc1, k2, repeat to end (24 st)
Row 6: inc1, k3, repeat to end (32 st)
Are you not getting the right stitch count at the end of your rows? You might possibly be using the wrong increase. The one I link to above does not “eat up” a stitch, so if you start with 6 st, you’ll [incr1, k1] 6 times. If you start with 8 st, you’ll [incr1, k1] 8 times.
Continue in this manner until the circumference of your knitting is a little smaller (an inch less? Thereabouts?) than the circumference of the head you’re knitting for. (Still not planning to block. I’m as cavalier as ever.)
Row 23 (or whatever) and all odd rows thereforth: k
Keep knitting until you only have a few yards left, or until it looks like a hat. Then think about ribbing for a while. Or, if you prefer a rolled brim, just keep knitting. BO loosely. Sew in the ends.
It doesn’t look like much, does it? Nothing earth-shattering. But I will remind you: it is a hat with no math!
My, my – my little hat has gotten a lot of attention! 145 hits in the first week – wow! Thanks to everyone who has taken a look, and thanks for the Ravelry love!
So, here are some more things you can do with this cute little hat.

Run out of yarn? Just start with something new! The blue is Pingouin Typhon (Ravelry link). The white is some random fluffy stuff from the stash.

Two smallish balls? (of yarn, folks! come on…) Just alternate. I started a new color with each YO round. I did several rows of one color in straight K for the brim. Cream is Patons Classic Wool. I think the lavender is Patons Canadiana.
Definitely my favorite…

I started with a bit of i-cord, then use YOs to get up to 6 st to get started. I worked in green for a bit, then introduced the purple, decreasing the green by one st every other row. Because intarsia and circular knitting don’t mix, I had to carry both colors across until the leaves were done. I used both yarns for the YOs and for knitting into the YOs (just imagine that they are slightly “hairy” leaves!) Magically, when I was done with the leaves, I was also happy with the circumference, so once I went to all purple, I also went to all K. Both colors are Patons Canadiana from an old fruit hat kit.
Coming soon – a manly version!
Hi! I know you’re here for the hat pattern, which is the most popular thing here. But I wanted to let you know that my new book is up on Amazon! Check it out!

Click for a bigger image
So, I was browsing yarn.com’s closeouts (one of my favorite things to do!) and saw this adorable (and sadly discontinued) Classic Elite Bubbles. Something inside me shouted out “Kid hat!” I tossed a ball into my cart. It arrived, and sure enough, the “Kid hat!” refrain was still playing. But the ball was a bit smaller than I had hoped. It still seemed like “about a hat’s worth,” but I’d need to use every yard.
I also was in no mood to do a gauge swatch or a bunch of math, nor try to figure out exactly how much yarn the top shaping on a hat would take, so I could determine when to start… I just wanted to get knitting. So I did. Here’s how.
Yarn: whatever you like. Any weight – truly doesn’t matter. About a hat’s worth (I do this by squishing it in my hand and seeing if it kinda feels like squishing a hat. As you can tell, I’m a bit cavalier with my knitting.) I made a kid’s hat with one ball (61 yards) of bulky yarn here. I’m guessing two balls would be plenty for a grown-up hat.
Needles: whatever the label calls for, or a bit smaller. You can use dpns to start, then switch to a smallish (24”) circular, or you can stay on dpns throughout, or you can magic loop it.
Notions: a tapestry needle and a freewheeling attitude.

Click for a bigger image
CO 6 st. Distribute evenly on 3 dpns, or use a magic loop. Join, being careful not to twist.
Row 1 (and all odd rows): k
Row 2: yo, k1, repeat to end (12 st)
Row 4: yo, k2, repeat to end (18 st)
Row 6: yo, k3, repeat to end (24 st)
You see what I’m doing here, right? Increasing 6 st in every other row, lining up the yos to make pretty swirly lines.
Continue in this manner until the circumference of your knitting is a little smaller (an inch less? Thereabouts?) than the circumference of the head you’re knitting for. (The astute knitter will notice that I am not planning to block. No, I’m not. It’s all part of my cavalier plan.)
Row 23 (or whatever) and all odd rows: k
Row 24 (or whatever): yo, k to 2 st before the next yo, ssk, repeat to end
Repeat these two rows until you only have a few yards left, or until it looks like a hat. Then k solid for 3-4 rows, or until you run out of yarn. This will give you a little rolled brim. BO loosely. Sew in the ends.
Voila! A hat with no math!
Psst – have you seen the Manly Version of this hat?
I am thrilled to announce that my very first indie knitting pattern is for sale!

The Trellis Cup Cozy is a quick yet challenging gift for a friend, or yourself.
Three top variations are included: A fetching ruffle, a flirty fluted number, or a tailored i-cord.

This is just endless cabling. Fairly complex cables, too! Because of all the cables, the cup cozy is quite thick, nicely insulating your fingers from your hot hot beverage.

It uses about a third of a skein of Cascade 220 Superwash (Regular Cascade 220 works, too!). It’s a great way to use up your leftovers!
You can buy it on Ravelry, or right here:
