Knit Your Fear
I’d like to tell you a story.
Last year, someone I love a lot needed a kidney transplant. This isn’t the story of the transplant. It’s about something I did in the months leading up to the surgery, what my friend the psychologist would call a “coping mechanism.”
When the doctors started talking transplant, I freaked out a little. I had thought the options were a) get better, or b) death. I didn’t consider the third option: major surgery on two people I love. But that’s where this particular journey took us.
I wanted to learn all I could about the procedure. (Fun fact: unless they’re septic, the old kidneys are not removed!) I found myself staring at medical diagrams like this one. And I remembered something from high school – the world of difference between staring at a diagram and trying to draw it.
I don’t remember making the decision, but soon enough I was pawing through my stash for various bits and bobs of different colored yarns. Yes, my coping strategy was this: I knit a kidney transplant diagram.
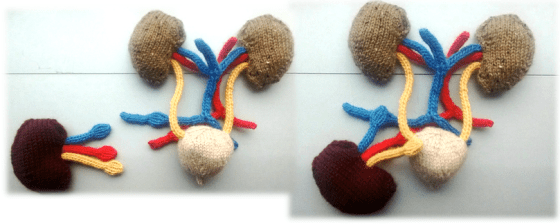
To da! It even has magnets, so you can “attach” the transplanted kidney.
Some technical notes on the construction:
- I started with this kidney pattern, which I found on Ravelry (apparently I’m not the first person to have the idea to knit organs). I wasn’t entirely happy with it, so I tweaked and re-worked it until I was. I made the decreases symmetrical (k2tog, ssk), and I moved them in a stitch or two so that the kidney was less flat. Eventually, I was happy with my design. As with any amiguri project, I kept my gauge nice and firm, so that the stuffing wouldn’t show through.
- I free-wheeled the bladder. I started it like a top-down hat, worked a few rows stockinette once it was big enough, then closed it off like a bottom-up hat. The bladder in the diagram was flatter at the top, so I used more “wedges” on the top half, to increase faster. Eight wedges on top, six on the bottom. I ended it with a few rows of i-cord to make the little knob at the bottom.
- The blood vessels and ureters are i-cord. (Yes, I knitted pee-tubes!) 4-stitch for the “trunk” vessels, 3-stitch for the “branches.” I had some fun joining them together at the “crotches” (a word my kid will not believe has a non-giggle-worthy meaning). The magnets I bought didn’t fit inside the i-cord, so when I got to the point where I needed to insert a magnet, I increased a couple of stitches to go up to 6 stitches for a few rows, tucked in the magnet, then decreased again. This had the added bonus of keeping the magnets in place, since they couldn’t slide around. I did check, repeatedly, that I had placed the magnet pairs so that everything snapped in place as it should – I didn’t want them hovering in space, or twisting around.
- I attached the i-cords to the organs by pulling the entire end of the i-cord through a stitch and anchoring it on the inside. Very clean and easy to control. This meant I had to go in a certain order:
-
- Make the organs, up to the last few rows. Attach the magnet to the inside of the bladder.
- Make the i-cords.
- Attach the i-cords.
- Stuff the organs. Finish and sew them up.
I grew superstitious about this project. I didn’t tell the “patient” about it, and I didn’t work on it at home. That meant I did most of the work at the karate dojo. As it took shape, people started asking me about it. I’d explain, and then the most amazing thing would happen. “Oh, my aunt’s on dialysis.” “My co-worker had a transplant two years ago and she’s doing great.” “My brother’s on the list and we’re praying.”
I wasn’t alone. In all my terror, in all my freakout, I felt so alone. But I wasn’t.
I took the finished diagram to the hospital with me. Those pictures above are the only ones I have – I took them on the windowsill in the ICU. The surgery went really well. The wonderful surgeon came to check on us every day. One day, as she was leaving, I gathered up my courage. “Do you have another minute?” I asked. “I’d like to show you something.” I pulled out my diagram and arranged it. She looked at it, quizzically, and after a moment she said, “This is anatomically correct.” It was the best comment she could have made. I gave it to her, and she said “Thank you. I will use this.” She didn’t say how, but I imagine that if she works on kids, she could use this cushy, wooly thing to show them what’s going to happen. I hope it helps.
So if you’re scared about something, I have some suggestions:
- Learn all you can. Solid knowledge is much more comforting than what my imagination can conjure up.
- Make something with what you learn. There’s magic in making something with your hands. And, I’ve thought a lot about this: I think writing counts. Whether you type or put pen to paper, you’re making something outside of your head, that you can step back and evaluate and edit. Writing counts as making, in my book.
- Talk to people. Whether the thing you make acts as an ice-breaker or you just reach out in any way you can, talk to some human beings. There are so many of us, and we’re really not all that different. Company eases fear.
This post was inspired by Martha Beck, who says to take the thing that fascinates you enough that you already have 10,000 hours practice (knitting) and which has seen you through hell (health crisis) and share it. So that’s what I’ve done.
A Mother Breathing
Oh, hey, I have a blog! Hello!
 A few months ago, I came runner up in a local writing contest. They published my piece on the Montgomery Magazine website, but I’m just going to go ahead and paste it here, too. Because, hey – this is my platform, and, apparently, this is my voice:
SITTING AT AIRPORTS, WAITING FOR PLANES
My husband’s idea of a nightmare is missing a flight. Even a sprint down an airless corridor, trailing overstuffed luggage and whining children, is enough to put him off his whole trip. We typically arrive two, sometimes three hours early, even for domestic flights. I’m all for it: sometimes the security lines are infinitesimally shorter at 5am, but the real reason is that it lets me do one of my favorite things.
I love sitting in airports, waiting for planes.
By now I’m pretty good at packing for these empty spaces within our trips. I’ll have my kindle and my knitting. I’ll bring an empty bottle to fill past security, a plastic cup for each member of the family, and a supply of dried fruit and trail mix. My husband watches the gate tango like a husky watching a squirrel, so I know we’ll stand at the precise moment to be first in line for the group that will be, inevitably, the last to be called to board the plane. My children munch their healthy-ish snacks and argue over who gets first turn on their shared kindle. I usually give up my own kindle for the sake of quiet.
And then I sit there, knitting forgotten in my lap, the buzz of announcements not really penetrating. At that moment, I’m exactly where I need to be. I zone out, guilt-free. It’s marvelous.
In college I took a class called “Locus and Platea in Shakespeare.” The professor wore clever boots and a hat that trailed peacock feathers. A week or two before winter break, one brave soul raised his hand and admitted that he had no idea what the words “locus” and “platea” meant. Three-quarters of the class swiftly agreed, and the rest of the semester was spent on remedial definition of basic terms. Maybe that’s why I remember these words so well now. Every class should end with a few sessions of “what the hell was all that about?”
As I recall, the locus is the world of the play, the world the characters inhabit, most with no notion that any other world exists. Some characters, however, can step into the platea, an in-between zone where they can address the audience directly and comment on the action of the play. An aside, a wink, a soliloquy—they exist in the platea.
The airport waiting lounge is my platea. I’m not at home, where two lifetimes’ worth of unfinished projects taunt me, nor am I trying to wring the most from every moment from our over-planned vacation, which has no hope of living up to the fantasies that have formed a layer over every conference call and grocery line for the past six months. In the airport, waiting for the plane, I’m not ignoring the state of the kitchen and I’m not discovering that I’m allergic to the South of France. I’m not checking homework while trying to produce a meal while wondering exactly which career move was the wrong turn while realizing that I haven’t called [insert relative here] in way too long. I’m not debating with my children whether it was cool for ancient Romans to have heated floors if it took slave labor to run them. I’m not contemplating the vast array of “creamy stuff in individual cups” that makes up an entire section of your average French grocery store, I’m not on a conference call, and I’m certainly not clutching at my children as they hurl themselves at the flimsy railing between the astronomical observatory and the mountain. Sitting in an airport, waiting for a plane, I just am.
Why does it seem revolutionary, this simple act of a mother breathing? I think the reason is this: for once, there is a easy answer to that horrible, inescapable question, “What should I be doing now?” Waiting at the airport, that answer is “Not much.”
I suppose this is the point of meditation: to be not quite here, not quite there. To witness the observer, observing your life, and toss her a joke. I’ve never quite managed that by sitting still in a quiet room, but I know I can find Nirvana at Gate 29b.
Short Story: Getting to Tufte
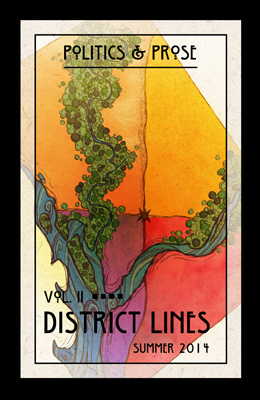 I am beyond thrilled to announce that my short story, Getting to Tufte, was recently published in Volume II of District Lines, from the venerable DC bookstore (and now publisher), Politics & Prose.
Here’s a taste of the story…
Having neglected to turn on either the baby monitor or the alarm clock, Melissa Lisstrom woke late to hysterical children who were convinced, since she did not tiptoe in at their first stirrings, that she must be dead. Traumatized, they refused to tell her whether they wanted oatmeal or granola. Things overflowed: the coffee, the diaper. Leaving her children to scowl at unwanted yogurt, she rushed upstairs and realized that the dress she had picked out the night before was ridiculous. She tossed on the best skirt ever and tried five different tops to go with it. With a whisper of regret for her telecommuter’s uniform of pajamas and fuzzy socks, she grabbed her one designer jacket (hand-me-down; sister-in-law). She felt both professional and artsy.
It’s a fantastic collection of local work. You can buy it here.
Big thanks to everyone at Politics & Prose – I couldn’t be more delighted.
How to Clean Your House in 6 Easy Steps
- Have a heart-to-heart talk with a trusted friend
- Read yourself into a stupor
- Wake up early with a nasty eye-strain headache
- Make coffee
- Drink coffee
- Pull out your morning pages journal. Write “Ok, if I do have deep-seated anger, what am I so angry about?”
Bam! Before you know it, it will be 3 o’clock in the afternoon, and your house will be spotless!
Flatmates Fingerless Gloves
In the rush of the past week, I forgot to blog about my latest pattern! This is pure Sherlock fun, cosplay for your hands. Make two Sherlock gloves, two John gloves, or one of each. Act out your favorite scenes from your favorite show!


Ally Hat
Should you, for any reason whatsoever, wish to make a hat based on the Ally Flag, either during the Sochi Olympics or at any other time, well, here’s a pattern for you. This hat is dedicated to Team SHERlocked, who inspired the Rainbowllenics Parade.

This hat is worked in garter st, flat.
Yarn: I made the original in ancient stash yarn that’s a touch heavier than worsted, with bits and bites of random worsted yarns for the stripes. You can use any yarn you like! You’ll need approximately equal amounts of black and white, and a few yards each of the 6 colors. Alternatively, you could use a black and white variegated yarn and a colorful variegated yarn for a more “impressionistic” approach. I’ll write the instructions for stripes, though.
Needles: Something appropriate for the yarn. I went up a needle size and was happy – it made the garter st a little loftier. Although you could, theoretically use straight needles, a circular will allow you to try it on. You may also want to go down a size or two for the bottom ribbing. Unless, of course, you don’t want ribbing at the bottom.
Accoutrements: You’ll need 7 st markers and a tapestry needle
Notes: You have two options when it comes to working the A. I’d recommend you decide ahead of time which you’ll do, so that you can prepare your yarn accordingly.
- Option A: Work in pure intarsia. You’ll need two separate balls of black and white, plus little bits of each for between the legs of the A. The advantage here is that the tension is easier to manage, though all the balls of yarn aren’t.
- Option B: This is what I did – draw the black or white yarn across the back of the A. You have to be good about your tension here, but it gives you fewer balls to manage. If you’re going to do this, here’s a trick: When you’re working on the right side, twist the carried (black or white) yarn every 3-4 st. However, when you’re working on the WS, just pull the carried yarn across the entire section (be sure to give yourself enough slack that you don’t make the A pouf). Then, on the next RS row, in addition to twisting your yarn every 3-4 st, also pick up the slack yarn once or twice and work it into a stitch. To do this, put your right needle in the next st, then poke it under the slack yarn. Wrap your yarn and finish the st as usual. There should be no effect on the RS. (See those little white flecks in the orange stripe? That’s where I forgot that you can’t twist yarn into the WS of garter st.)
More Notes: Theoretically, since this is top-down construction, you could use ANY weight of yarn. You just keep increasing until it’s the right size. The big difference is going to be the size of the A in different size yarns. So, if you’re using a bulky yarn, you may want to have only two rows per stripe. If you’re working in DK, Sport or smaller, you may want 6 or even 8 rows per stripe. The idea is the same – start with one red stitch, increase one st on either side every other row, and switch colors when you switch background color. You always want an even number of rows per stripe, and to start a new stripe on a RS row, for crisp color transitions.
And yet more notes! To increase in garter st, I like to knit into the purl bump below the next st.
Abbreviations
| BO | Bind Off |
| CO | Cast On |
| Garter St | K on RS, K on WS |
| Inc | Increase |
| K | Knit |
| PM | Place St Marker |
| RS | Right Side |
| St | Stitch |
| WS | Wrong Side |
Shall we start?
With black yarn and larger needles, CO 8 st.
Setup row (and all WS rows): K with the yarn you used for the previous row.
Row 1 (RS): [Inc 1, K1, PM] repeat to end (16 st) (no, you don’t have to PM at the end of the row)
Row 3: Start using white yarn. [Inc 1, K 2] repeat to end (24 st)
Row 5: At the beginning of the row, twist the black and white yarn. Use white yarn for the next four rows. [Inc 1, K3] repeat to end (32 st)
Row 7: Drop white yarn and pick up the black yarn from underneath. Use black yarn for the next four rows. [Inc 1, K4] repeat to end (40 st)
Continue in this manner, [Inc 1, K to next marker, sl M] repeat to end (incr 8 st per row), until the hat is the right size around. Don’t remove the markers – you may want them later.
Ok, more note time, now! If you want a beanie, stop increasing when the width is equal to the head circumference you’re aiming for, or maybe an inch or two less for snugness. If you want to make more of a beret shape, like mine, make it an inch or two larger than the head size. I have made many many top down hats and I get this wrong ALL THE TIME (seriously – I was going for a beanie when I made the original). If you discover that your hat is too big, there are two things you can do: 1) mark where you should have stopped increasing, and rip back to that point. 2) work some decreases towards the end and call it a beret.
Once your hat is the right size, stop increasing and just work Garter st until you get to the end of a white row. Pick a point where you want the A to begin – the half-way point is a good spot. Work the chart, placing the first red st where you chose.
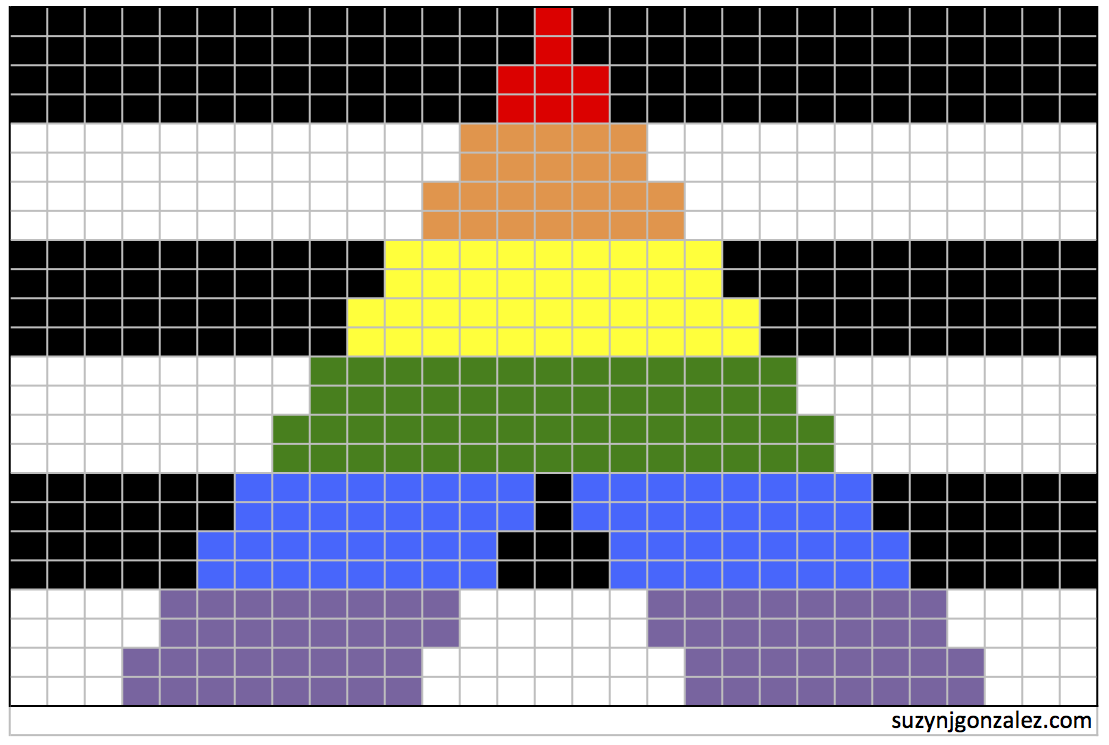
When you’re done with the chart, keep going with stripes until the hat is as deep as you like. If you’re making a beret, now would be a good time to decrease at each marker for a round or two.
Finally, end as you like: switch to smaller needles and work a rib, or switch to stockinette (K on RS, P on WS) to make a rolled brim, or just keep going in garter st until it’s long enough. BO loosely. For rib, I like this bind off. Cut your yarn, leaving a nice long tail for sewing up.
Carefully sew in the colored ends, making sure to close any holes.
Now, for the seam. I think of sewing garter st seams as a zipper: take your BO tail, thread it onto a tapestry needle, then go through single purl bumps on alternate sides until it’s all “zipped up.” It’s easy to make this seam too tight, so give it a nice stretch once you get to the top. Then go through every other CO st and pull tight to get rid of the hole at the top.
Block if you care to; I rarely do.
Enjoy and wear with, dare I say it, pride! Here’s the Ravelry link.
Comments or questions? Please ask away!
Elf Hat!
Just in time for Christmas knitting, it’s an elf hat!!
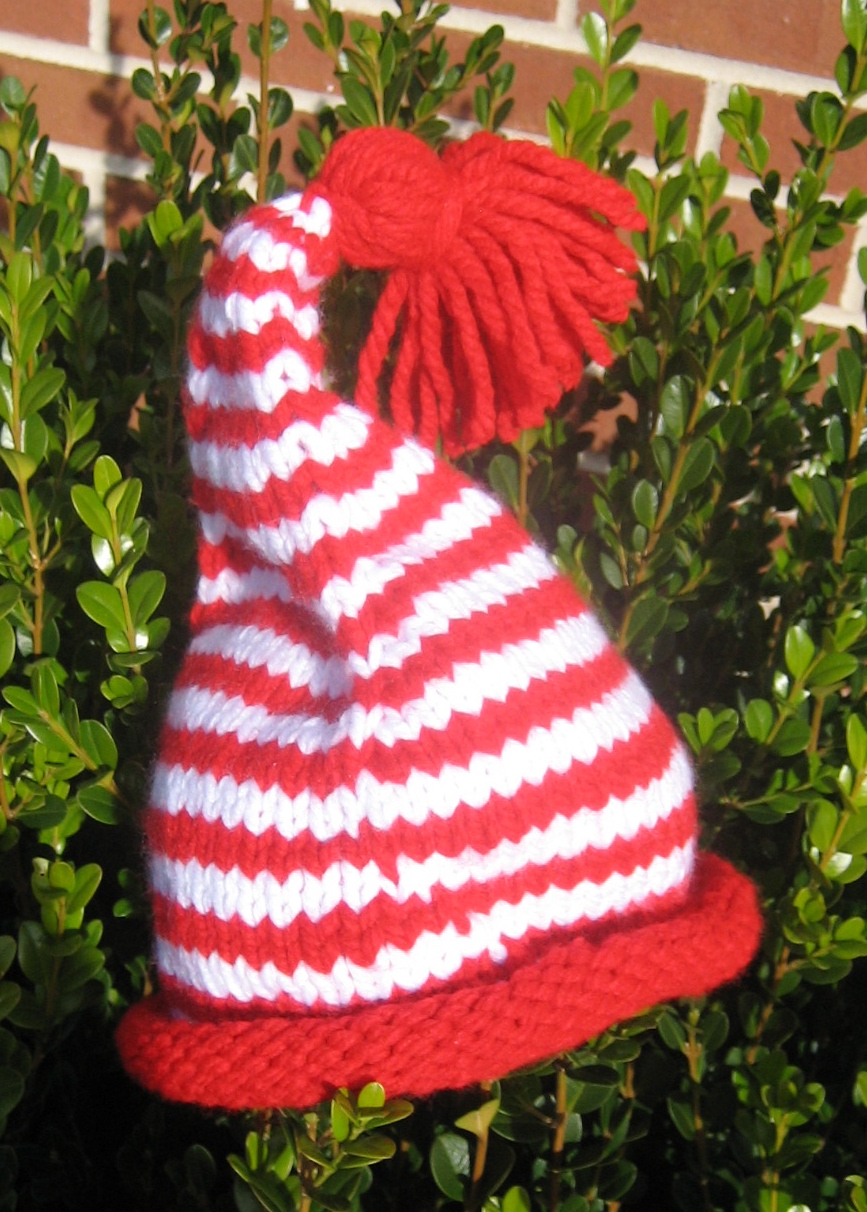
Quick and easy, perfect for the kids on your list. This is just my Top Down No Math Manly hat, started with 3 st instead of 6! Made of Bernat Softee Chunky on size 10 1/2 needles, it worked up in about two non-intensive evenings.
I’ll write the pattern out here, but if you’ve made my top-down no math hat before, just CO 3 and away you go.
Yarn: Whatever you like.
Needles: whatever the label calls for, or a bit smaller. You can use dpns to start, then switch to a smallish (24”) circular, or you can stay on dpns throughout, or you can magic loop it.
Notions: a tapestry needle and a freewheeling attitude.
Pattern Note: You’ll want to know about a very nearly invisible increase from the the awesomely wonderful TechKnitting. When I use inc1 below, this is what I mean.
CO 3 st.
Row 1 (and all odd rows): k. Work the first round as if you’re doing icord – just slide the st to the other end of your dpn or circular, and tug the yarn tight before you begin.
Row 2: inc1, k1, repeat to end (6 st) At this point, or maybe after row 4, you might want to distribute evenly on 3 dpns. If you’re using magic loop, you’re already good to go.
Row 4: inc1, k2, repeat to end (9 st)
Row 6: inc1, k3, repeat to end (12 st)
What I’m doing here is increasing 3 st in every other row. If you want a really long, floppy elf hat, you can work more K rows between the increase rows.
Continue in this manner until the circumference of your knitting is a little smaller (an inch less? Thereabouts?) than the circumference of the head you’re knitting for.
Note: it’s really easy to make these hats too big. Happens all the time. You get increasing, you smush your stitches so they won’t fall off the dpns, and the next thing you know the hat’s too big. There are a few things you can do:
- Stop increasing a little earlier than you think
- Rip back to when the increases were enough
- Decrease a bit towards the end.
Once you’ve increased enough, just knit around and around until it’s long enough, or you’re about to run out of yarn. I just BO loosely and let it roll up. You can rib, or do a few rows of garter st, as you prefer. Sew in the ends, and seriously consider adding a pom pom or tassel.
Enjoy!
Top-Down, No Math Hat: FourSquare
Ok, folks, I can take a hint. My two Top-Down, No Math hats account for over half the hits I have ever gotten on this site. So, I will give you more. Yes! A new Top-Down, No Math hat, this time aptly named: FourSquare. It looks like a hot-cross bun, doesn’t it?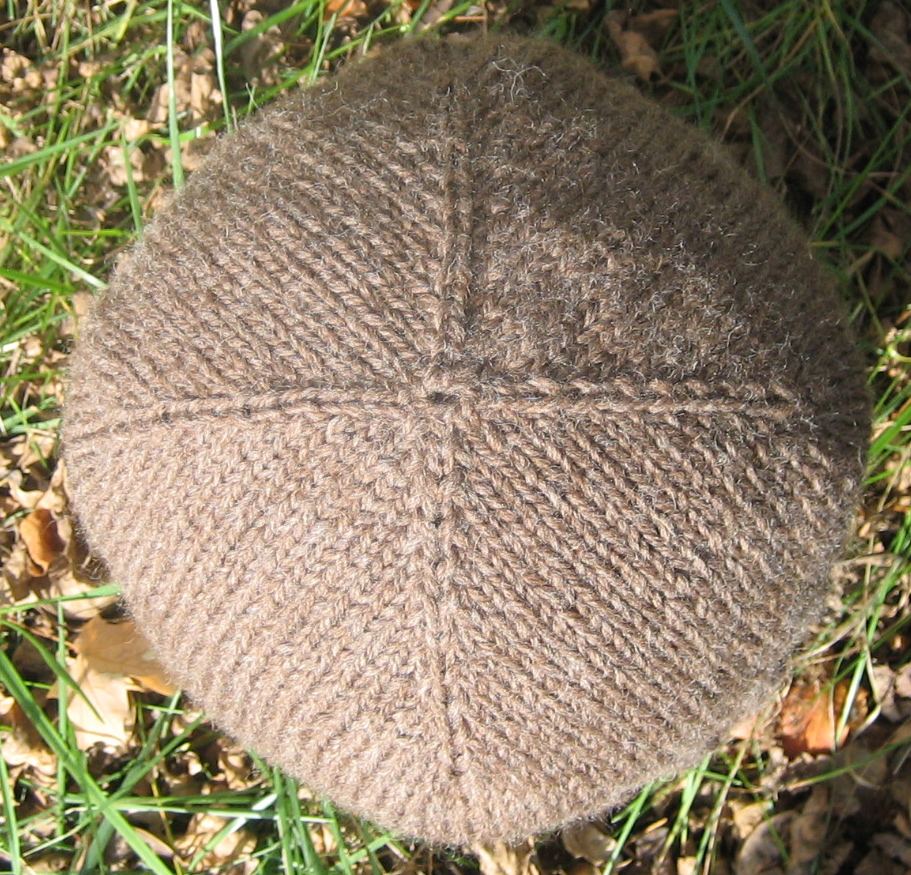
Here we go:
Yarn: Same as the others, yarn is whatever you like, about a hat’s worth. In the sample, I used Cascade EcoWool, which is lovely stuff.
Needles: Needles should be appropriate to the yarn. You’ll need to start either on dpns or a magic loop. By the end, you’ll either need more/longer dpns, or a circular.
Notes: We’re going to use two different increases. The first is the same nearly invisible increase we used before. The second is the same idea, but heading left. I’m going to point you to this lovely tutorial from the Twist Collective, and use her terminology: RLI and LLI. (I’m told that link is now dead, but this one should work.)

Ready? Let’s begin.
CO 8. Join in the round, being careful not to twist.
Round 1: K all, placing a marker after stitches 1, 3, 5, and 7.
Round 2: [RLI, K2, LLI] 4 times (16 st)
Round 3 and all odd rounds: K
Round 4 and all even rounds: [K to 1 st before st marker, RLI, K2, LLI] 4 times, K to end of round.
So, here’s the weird part: even though you’re working 2 st around each marker, the result looks like a single st going the other direction. If you want the cross to be bulkier, you can work an extra stitch or two around each st marker (inside the increases).
Keep going until you have the circumference you want, then work plain stockinette until you feel like doing ribbing, have enough for it to curl under, or run out of yarn.
BO loosely. My favorite trick is to go up a few needle sizes for the bind-off row.
If you like this or any of my other patterns, would you drop me a comment letting me know? Nice comments make my day. Thanks.
The Purple Teacozy
Have you encountered BBC Sherlock yet?
Have you encountered BBC Sherlock fandom?
Have you encountered the Purple Shirt of Sex?
I have, recently, and when you add in the Ravellenic Games, well, there was only one logical course of action.
I present the Purple Teacozy of Sex:

The pattern is available on Ravelry and LoveKnitting. Why don’t you make yourself one!?
